I’m so excited to share this recipe with you all, not only because it’s one of my favourite recipes but also because I have teamed up with Pyrex to do a HUGE giveaway! Pyrex is a brand I’ve used and loved for all of my baking career, I will be doing a blog review of the products in the next week or so.

I hope I’ve made the recipe easy to follow. Please do comment if you have any queries, I’d love to see your bakes too so feel free to tag @emma.hellocake and@hellocake.uk on Instagram.
Cake Ingredients:
- 1lb Self-raising Flour
- 14oz Unsalted Butter (room temperature) or Stork
- 14oz Caster Sugar
- 7 Large Eggs
- 1 tsp Baking Powder
- 75g White Chocolate
- 200g fresh or frozen raspberries.
White Chocolate Buttercream Ingredients:
- 250g Unsalted Butter (room temperature)
- 500g Icing Sugar
- 50g White Chocolate
Topping Ingredients:
- 200ml Double Cream
- 100g Dark Chocolate
- 100g White Chocolate
- Sprinkles of your choice
- Fresh flowers for the wow-factor!
Equipment:
- Stand Mixer with paddle attachment OR
- Hand Held mixer with large mixing bowl (try Pyrex Classic Glass 4.2l Expert Bowl for easy mixing!)
- Silicone spatula – if you haven’t got one, get one. They come in so handy for so many things!
- Oven
- Scales
- 3 Lined(I just line the bottom with greaseproof paper) and greased 20com Pyrex Magic spring form cake tins.
- Wire cooling rack
- Pyrex Prep & Store 2l glass bowl with lid (you don’t need to lid for this recipe but it’s very handy for storing ingredients before hand or if there’s any leftover)
- Heatproof Pyrex Bowl
- Pyrex Classic glass baking tray 32cm x 26cm
- Pyrex glass ramekins
- Knives and various other utensils that every kitchen has!
Preheat Oven to 165 degrees Fan.
Step One
In a stand mixer with a paddle attachment mix your butter/stork and caster sugar until it’s well combined, light in colour and fluffy (the fluffier the better, sometimes I leave my mixer running for 5 minutes or so!). You might need to scrape around the sides a couple of times.
While this is mixing melt your white chocolate in a heatproof Pyrex measuring jug for 30 bursts in the microwave until it’s all melted, then add this to the butter, sugar mixture and keep mixing.
Step Two
Crack Eggs into a separate bowl and whisk a little. Watch out for any shell!
Step Three
Add the eggs to the butter and sugar mixture along with all flour and baking powder and mix until well combined. Start off mixing and slowly increase the speed. Again, make sure you scrape down the sides of the bowl so it’s all mixed in.
Step Four
Divide the mixture into the baking tins. Take your raspberries and divide them equally between the two tins, you want to push some down into the tin and leave some near the surface so hopefully you get them nicely spread out inside the cakes once they’re baked. Then pop the cakes in the oven.
Do not check your cakes for at least 35minutes. This will affect the oven temperature which will spoil the bake!
You can tell when they’re baked if they have started to shrink away from the sides slightly and if you insert a skewer/knife into the centre and it comes out clean. Carefully take out of the tins and cool on a wire rack until they’re completely cool.

Step 5
While the cakes are baking/cooling you can make the chocolate shards which is super easy. Just melt the chocolate in the Pyrex measuring jug as you did before, and then spread the melted chocolate onto a Pyrex glass baking tray lined with greaseproof paper. Then sprinkle whatever toppings you like on top and pop in the fridge to set. Which will probably take and hour or so.

Step 6
To make the white chocolate buttercream, in a stand mixer or handheld mixer whip up the butter until it’s light and fluffy and gradually add the icing sugar on a low speed until it’s all combined.
Melt the white chocolate as you did previously and add this to the buttercream and mix for a few minutes or so. You can now add any food colouring of your choice. I chose pink, naturally!
Step 7
Once the cakes are cool cut the tops of each cake too so that when they’re stacked up they’re nice and level.
Step 8
Start to layer up your cake, sandwiching each layer together with a little buttercream and a layer of raspberry jam. Once it’s all together cover the entire cake in a rough coating of buttercream to lock in all the crumbs and pop the whole cake in the freezer to set for 10 minutes.
Try not to contaminate the buttercream mixture with any crumbs!
Take the cake out of the freezer and cover the entire cake with a layer of the buttercream and scrape around the sides with a flat scraper, to get it as neat as you can. (I did a detailed blog post on butter creaming before here.)
Step 9
To make the chocolate ganache drip – using a heatproof Pyrex glass bowl over a pan of boiling water heat your cream until it’s just coming to the boil and pour this over the dark chocolate and leave for 5 minutes. Then stir together using a spatula and it should come together to be a glossy, shiny ganache.
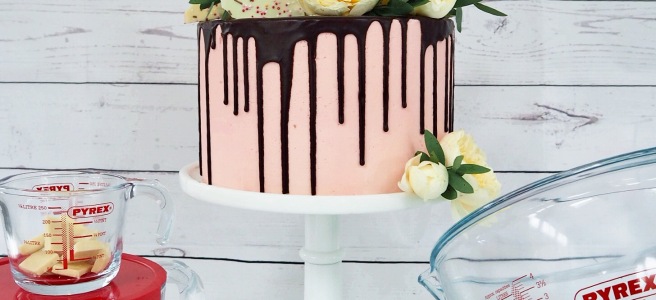
You can then pour into a mini Pyrex measuring jug and drizzle the over the buttercream cake and push it over the edges gradually to create the drip effect. I like to use a teaspoon to do the drips gradually first and then cover the top.


Step 10
Finally, take the chocolate shards out of the fridge and break up to create the shard-like pieces and arrange them on top of the cake with any extra toppings you like. I added fresh flowers, just because!
Don’t forget to enter the amazing giveaway for all the Pyrex goodies!!
Lots of love Emma.hellocake xx


Wow what a gorgeous cake! I tried my very first drip cake recently, safe to say it wasn’t as neat and beautiful as this! 🙂 Still tasted good though, haha!
LikeLiked by 1 person
I never tried drip cake, I will now thank you for sharing
LikeLiked by 1 person
MMmmmm, this sounds sooooo goood!!!
LikeLiked by 1 person